



On this page
You can install Ollama on a Linux VPS, run it as a systemd service, and keep its API private by default. Size RAM and storage around the models you retain, the context window you request and the number of simultaneous requests you expect; expose the API only through a restricted network path or an authenticated reverse proxy.
This guide covers CPU-only planning, Ubuntu preparation, installation, service checks, model storage, firewall boundaries and controlled remote access.
Choose a VPS for Your Ollama Workload
Decide between CPU-only and GPU-backed inference
A Linux VPS without a supported GPU can run Ollama in CPU-only mode. CPU-only operation is useful for testing, development and low-throughput private tasks, but response time depends on the selected model, available CPU capacity, memory pressure and concurrent work.
If you require GPU acceleration, first verify that the server hardware and drivers match Ollama's documented support paths. Do not assume that a VPS includes a compatible GPU merely because it has multiple vCPUs.
Plan RAM for model size and context
There is no published universal VPS minimum for Ollama. Start with the model download size, leave room for the operating system and service processes, then allow additional headroom for the requested context window and concurrent requests. Larger context windows need more memory.
For perspective, Ollama's quickstart describes one Gemma 4 E2B download as about 7.2 GB and recommends 8 GB of available VRAM or unified memory for that example. When VRAM is insufficient, Ollama can use system RAM, although responses may be slower.
Reserve NVMe space for models, the OS and logs
Keep capacity for the Linux operating system, downloaded model files, temporary operational headroom and journal logs. Retaining several models increases storage use, so measure after each pull instead of treating one model's footprint as a sizing rule for all models.
Match private APIs, development and automation to a plan
Model size, context, concurrency and retained model files determine resource needs. Compare verified vCPU, RAM and storage specifications before ordering; you can compare the current cloud options on Cloud VPS plans guide and review Linux-focused options on Linux server options.
The table below matches common Ollama workload profiles to DigiRDP VPS options.
| Requirement | Plan | vCPU | RAM | Storage | Location | Setup time | Pricing |
|---|---|---|---|---|---|---|---|
| Single small project or service | Cloud VPS Host IPV6 | 1 vCPU | 1 GB | 10 GB disk (RAID 50) | USA- New York | Instant Setup or Up to 12hrs | See plan page |
| Builds, tests and a few containers | Cloud VPS Host Plus | 1 vCPU | 2 GB | 20 GB disk (RAID 50) | USA- New York | Instant Setup or Up to 12hrs | See plan page |
| Larger repos, databases or several agents | Cloud VPS Host Pro | 3 vCPU | 4 GB | 40 GB disk (RAID 50) | USA- New York | Instant Setup or Up to 12hrs | See plan page |
| Heavy builds, CI or many concurrent workloads | Cloud VPS Host Deluxe | 4 vCPU | 6 GB | 60 GB disk (RAID 50) | USA- New York | Instant Setup or Up to 12hrs | See plan page |
Prepare Ubuntu and Verify Server Access
Confirm architecture and available resources
Use a supported Linux VPS, SSH access and an account that can run administrative commands. Before installation, check the machine architecture, memory, mounted filesystems and free space; keep the API local until you have completed the security design.
Run these read-only checks after signing in over SSH.
uname -m
free -h
findmnt -D
df -h
For related SSH and Linux administration guidance, see DigiRDP knowledge base options.
Update the operating system
Apply available Ubuntu package updates before adding the application, then reconnect if the update process indicates that a reboot is required.
Run the following package commands in order.
sudo apt update
sudo apt upgrade
Check firewall and listening-port policy
Decide which management source addresses may reach SSH before changing any firewall policy. Do not add a public inbound rule for Ollama's API port during initial setup; the default local listener does not need one.
Inspect currently listening TCP sockets and the active firewall state before making changes.
sudo ss -ltnp
sudo ufw status verbose
Install Ollama and Download a Test Model
Run the official Linux installer
Ollama documents the following official Linux installation command. Review it before execution, as it downloads and runs the vendor installation script with elevated installation actions.
curl -fsSL https://ollama.com/install.sh | sh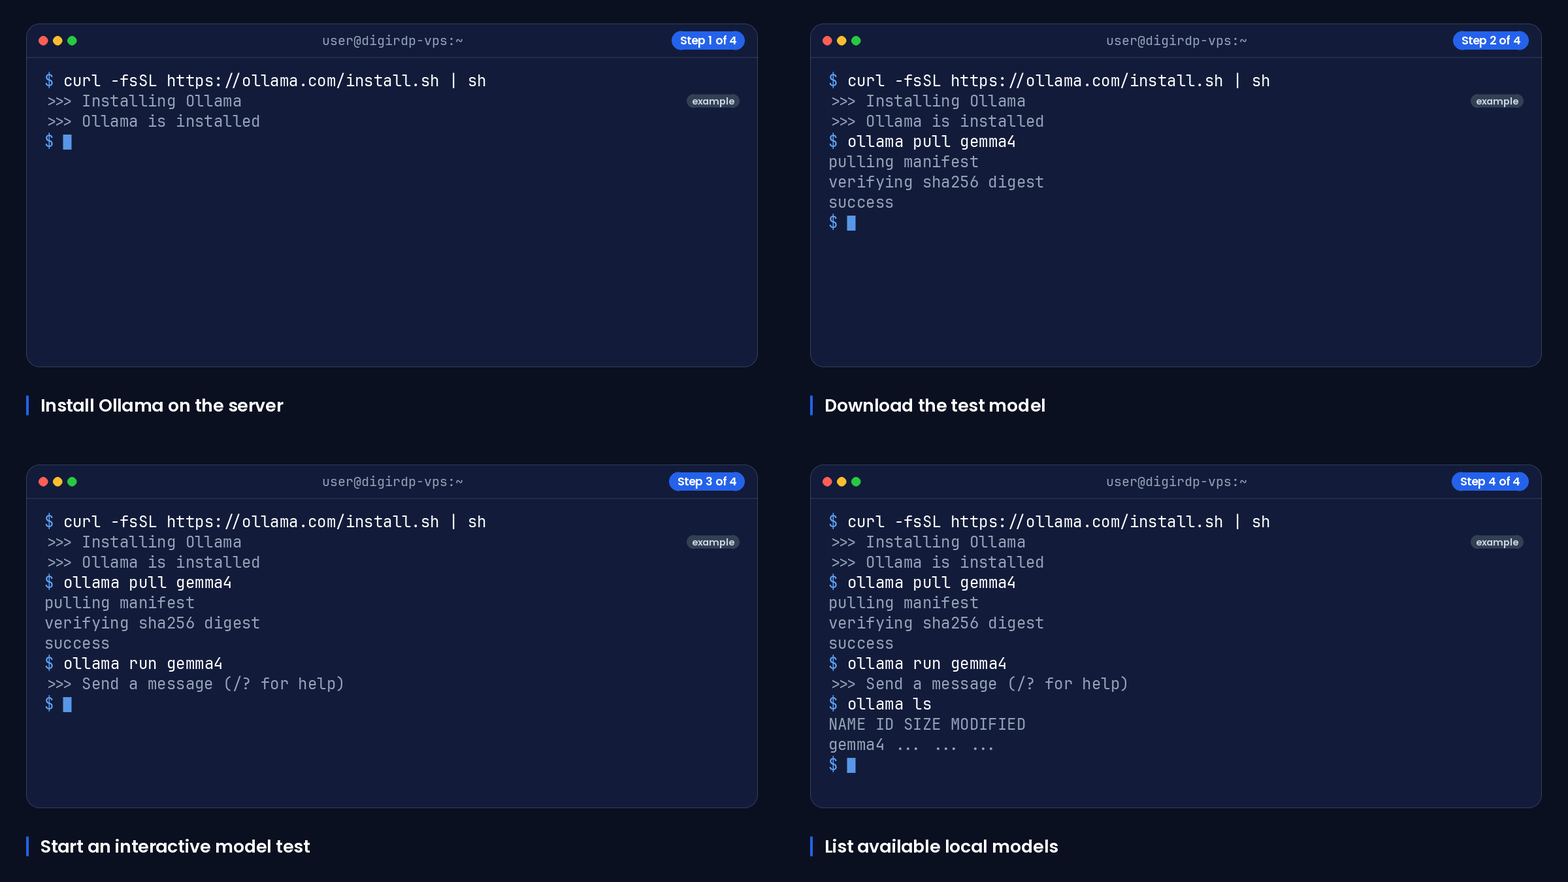
The standard Linux installation creates an ollama system user and group, installs a systemd service and configures that service to restart automatically.
Pull and run a test model
After installation, download a test model, start an interactive prompt, and list locally available models. Exit the prompt with Ctrl+C when the test is complete.
ollama pull gemma4
ollama run gemma4
ollama ls
Remove unneeded models using Ollama's model-removal command to recover retained model storage.
Use CPU-only operation when no supported GPU is present
The Linux installer can detect that no NVIDIA or AMD GPU is available and install Ollama for CPU-only operation. Monitor memory and storage during the first model pull and test, then select smaller models or reduce concurrency if the VPS becomes resource-constrained.
Keep Ollama Running with systemd
Use systemd to make the service start after boot and to provide a consistent status and log interface. The documented Linux unit starts /usr/bin/ollama serve after the network is online.
Enable and check the Ollama service
Enable the service and inspect its current state with these commands.
sudo systemctl enable ollama
sudo systemctl status ollama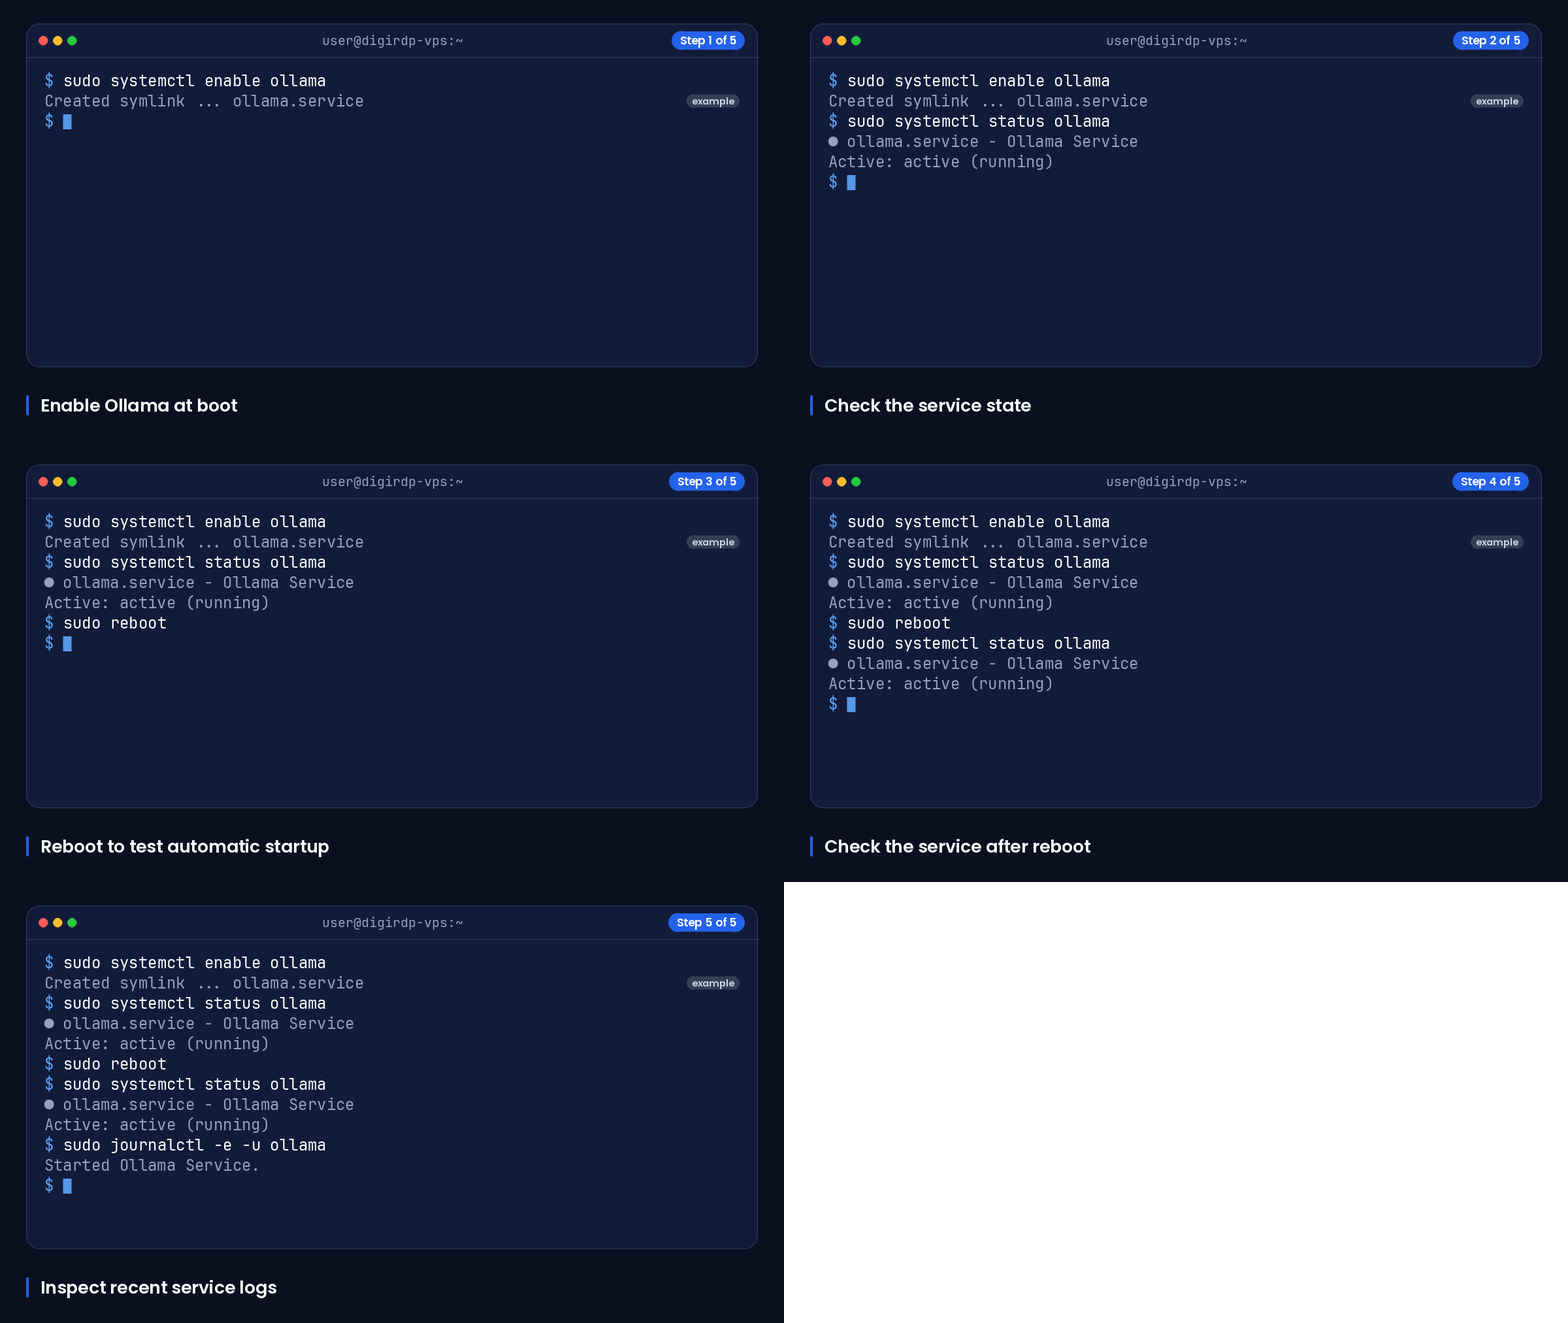
A running service should show an active state. If it is not active, read the log output before attempting repeated restarts.
Verify restart behaviour after a reboot
Reboot only when you have an active SSH path back to the VPS, then reconnect and check the service again.
sudo rebootAfter the server is reachable again, run this status check.
sudo systemctl status ollamaRead service logs when startup fails
Use the systemd journal to inspect the most recent Ollama service messages.
sudo journalctl -e -u ollamaCheck configuration syntax, ownership of any custom model directory and available disk space before restarting the service.
Plan Model Storage and Service Configuration
Measure downloaded model storage
On Linux, the standard installer stores models in /usr/share/ollama/.ollama/models by default. Measure that path and the filesystem that contains it after downloading a model.
Run these commands to inspect model-directory and filesystem use.
sudo du -sh /usr/share/ollama/.ollama/models
df -h /usr/share/ollama/.ollama/models
Move the model directory to a mounted volume
If model storage is the limiting resource, attach and mount the intended volume before changing the service. You can review storage-oriented VPS options on AMD EPYC Storage VPS.
Create a directory on the already mounted volume and assign it to the Ollama service account.
sudo mkdir -p /mnt/ollama-models
sudo chown -R ollama:ollama /mnt/ollama-models
For a systemd-managed service, use the systemd editor to create a drop-in configuration.
sudo systemctl edit ollama.serviceAdd the following content to the editor, save it, and close the editor.
[Service]
Environment="OLLAMA_MODELS=/mnt/ollama-models"
Set ownership and reload the service
The ollama service user needs read and write access to the directory selected through OLLAMA_MODELS. Reload systemd and restart the service after saving the drop-in.
Run these commands, then re-check the service state and directory ownership if model loading fails.
sudo systemctl daemon-reload
sudo systemctl restart ollama
sudo systemctl status ollama
Secure Remote Access to the Ollama API
Keep the default localhost listener
The local Ollama API listens on 127.0.0.1:11434 by default and does not require authentication. For that reason, do not expose the API directly to the public internet; use network restrictions or an authenticated proxy when access must extend beyond localhost.
The table below compares local-only use, a controlled private-network binding and an authenticated reverse-proxy design.
| Access pattern | Exposure | Firewall boundary | Suitable use | Operational trade-off |
|---|---|---|---|---|
| Local-only listener | Processes on the VPS | No inbound API rule | Local scripts and services | Remote clients cannot connect directly |
| Private-network binding | Approved private-network clients | Allow only the required private source range | Controlled internal integrations | Requires private routing and source-rule maintenance |
| Authenticated reverse proxy | Clients approved by the proxy policy | Expose only the proxy; keep Ollama local | Remote application access with an authentication layer | Requires certificate, authentication and proxy maintenance |
Bind to a controlled private address with OLLAMA_HOST
Ollama supports changing its bind address and port with OLLAMA_HOST. Use a controlled private address only when private routing and firewall rules limit access to approved clients.
Open the service drop-in editor.
sudo systemctl edit ollama.serviceAdd this example, replacing the address with your controlled private address, then save and close the editor.
[Service]
Environment="OLLAMA_HOST=10.0.0.10:11434"
Reload systemd and restart Ollama to apply the binding change.
sudo systemctl daemon-reload
sudo systemctl restart ollama
sudo ss -ltnp
Place an authenticated reverse proxy in front of Ollama
Ollama documents that its HTTP server can be exposed through a proxy such as Nginx. Keep Ollama bound locally, make the proxy the only public-facing component, and configure authentication and encrypted transport at that proxy before allowing remote clients.
Do not treat a reverse proxy alone as authentication. Confirm that unauthenticated requests are rejected and that the proxy forwards only the routes your application needs.
Restrict firewall rules and browser origins
Permit SSH only from approved management addresses. For a private listener, limit API traffic to the required private source range; for a proxy design, allow inbound traffic only to the proxy and keep port 11434 closed publicly.
Ollama allows additional browser origins through OLLAMA_ORIGINS. Add only the precise origins required by your browser application, rather than using a broad origin policy. For broader server-hardening guidance, see DigiRDP blog guide.
Frequently Asked Questions
Can I host Ollama on a VPS?
Yes. A Linux VPS can run Ollama, including CPU-only operation when no supported GPU is available. Select capacity based on the models you retain, context size and expected concurrency rather than relying on a universal minimum.
How do I install Ollama on a server?
Connect through SSH, update Ubuntu, run Ollama's official Linux installer, pull a test model and verify the systemd service. Keep the default local API listener during the initial test.
How much RAM does Ollama need on a VPS?
Ollama does not publish a universal VPS RAM minimum. Account for the model, operating system, context window and concurrent requests; larger context windows require more memory.
Can I run Ollama on a CPU-only VPS?
Yes. The Linux installer can detect the absence of NVIDIA or AMD GPUs and install Ollama for CPU-only operation. Expect performance to depend on the model and available server resources.
How do I keep Ollama running after reboot?
Enable the ollama systemd service, reboot at a planned time, then confirm the service state using the commands shown above.
How do I expose the Ollama API safely?
Keep it on localhost where possible. If remote access is necessary, bind it to a controlled private address with restrictive firewall rules, or keep Ollama local behind an authenticated reverse proxy. The local API has no built-in authentication.
Explore more Linux self-hosting guidance.
Sources
- ollama/docs/linux.mdx at main · ollama/ollama · GitHub — github.com
- ollama/docs/cli.mdx at main · ollama/ollama · GitHub — github.com
- ollama/docs/faq.mdx at main · ollama/ollama · GitHub — github.com
- ollama/docs/api/authentication.mdx at main · ollama/ollama · GitHub — github.com
- ollama/docs/quickstart.mdx at main · ollama/ollama · GitHub — github.com
- ollama/scripts/install.sh at main · ollama/ollama · GitHub — github.com
- ollama/docs/gpu.mdx at main · ollama/ollama · GitHub — github.com
Ready to deploy your own server?
Full admin access, DDoS protection and instant setup — pick a plan sized to your workload.
Explore Cloud VPS plans