



On this page
You can change the RDP listening port by updating the PortNumber value for RDP-Tcp, allowing that same port through Windows Firewall and any upstream firewall, then testing a second connection before ending the first session. Use an administrator account, back up the listener key, and retain console or recovery access so that you can reverse the change if the replacement port is unreachable. Microsoft documents this procedure for Windows Server 2016, 2019, 2022 and 2025, plus Windows 10 and Windows 11.
This guide covers the safe order of operations: prepare recovery access, confirm the port is unused, update the registry, configure firewall rules, test from a separate client, and roll back if required.
Prepare a Safe RDP Port Change
Do not make the registry change from your only route to the server. Keep the current RDP session open and confirm that you have administrator access plus an alternative console, out-of-band access method, or another authorised administrator who can restore the former setting.
Confirm administrator access and an alternative console
You need administrator access or equivalent permissions on the target computer. Confirm that Remote Desktop is enabled and that you can reach the server through a recovery route before editing the listener configuration.
Choose an unused replacement port
Select a TCP and UDP port that is not already assigned to another service. Avoid using a port merely because it is commonly mentioned elsewhere; verify its state on this specific server first.
Back up the RDP listener registry key
Microsoft advises backing up the registry before modifying RDP listener settings because incorrect registry changes can cause serious problems. Open an elevated Command Prompt or PowerShell window and export the listener key before making any change.
reg export "HKLM\SYSTEM\CurrentControlSet\Control\Terminal Server\WinStations\RDP-Tcp" C:\Rdp-tcp-backup.regConfirm the server access method and recovery access before changing the listener port. If you are provisioning a new Windows remote desktop for remote administration, you can compare current Windows environments on Windows RDP plans or review more isolated remote-desktop options on Private RDP plans options.
The table below matches common requirements to DigiRDP plans before you apply the procedure.
| Requirement | Plan | vCPU | RAM | Storage | Location | Setup time | Price (USD, live) |
|---|---|---|---|---|---|---|---|
| Browsing, email and light apps | USA ADMIN RDP #2 | 2 vCPU | 2 GB | 40Gb SSD/NVMe | New York/Dallas | Instant Setup or Up to 12hrs | $9.59/mo, billed annually ($115.10) |
| Several apps and multitasking | USA ADMIN RDP #4 | 3 vCPU | 4 GB | 80 GB SSD | New York/Dallas | Instant Setup or Up to 12hrs | $14.39/mo, billed annually ($172.70) |
| Heavy multitasking and developer tools | New York Ryzen RDP #6 | 6 vCPU | 8 GB DDR4 | 120 GB NVMe | USA-New York | Instant Setup or Up to 12hrs | $27.19/mo, billed annually ($326.30) |
| Rendering, encoding or many sessions | USA ADMIN RDP #8 | 6 vCPU | 16 GB | 200Gb SSD/NVMe | New York/Dallas | Instant Setup or Up to 12hrs | $47.99/mo, billed annually ($575.90) |
Keep the exported C:\Rdp-tcp-backup.reg file somewhere available to a console session. It contains the pre-change listener configuration for recovery.
Check the Selected Port Before Reassigning It
RDP uses TCP and UDP port 3389 by default, but the host and client can be configured for another port. Check the intended replacement port before assigning it, rather than assuming that a high-numbered port is available.
Check listening ports with netstat
Run the following in an elevated Command Prompt, replacing 3390 with the port you intend to use. The command displays matching TCP and UDP listeners and their process IDs.
netstat -ano -p TCP | findstr :3390
netstat -ano -p UDP | findstr :3390
If either command shows a listener for the chosen port, select another port or identify the existing process before proceeding. The netstat command displays active connections and listening TCP and UDP ports, while -o adds the process ID.
Why port 445 is not the normal direct RDP client port
Port 445 is not the normal direct RDP client port. Microsoft documents TCP 445 and RPC for some internal Remote Desktop Services role connections, whereas the standard direct RDP listener uses TCP and UDP 3389 unless you change it.
Change the RDP Listening Port in the Registry
The listener setting is the PortNumber value under HKEY_LOCAL_MACHINE\SYSTEM\CurrentControlSet\Control\Terminal Server\WinStations\RDP-Tcp. Make the change only after the backup and port check are complete, and do not sign out of the existing RDP session until a new-port sign-in has succeeded.
- Keep your current RDP connection open and have the exported registry backup and recovery route ready.
- Read the current
PortNumbervalue from an elevated PowerShell session. - Set the replacement port, then confirm the stored value.
- Restart Remote Desktop Services or restart the server so the new listener assignment takes effect.
- Create the firewall rules and test a separate RDP connection using the new port before closing the original session.
Use the following commands to read the existing value, set 3390 as the example replacement value, verify it, and restart the service. Replace 3390 with your chosen unused port.
$rdpPath = 'HKLM:\SYSTEM\CurrentControlSet\Control\Terminal Server\WinStations\RDP-Tcp'
Get-ItemProperty -Path $rdpPath -Name 'PortNumber'
Set-ItemProperty -Path $rdpPath -Name 'PortNumber' -Value 3390
Get-ItemProperty -Path $rdpPath -Name 'PortNumber'
Restart-Service -Name TermService -Force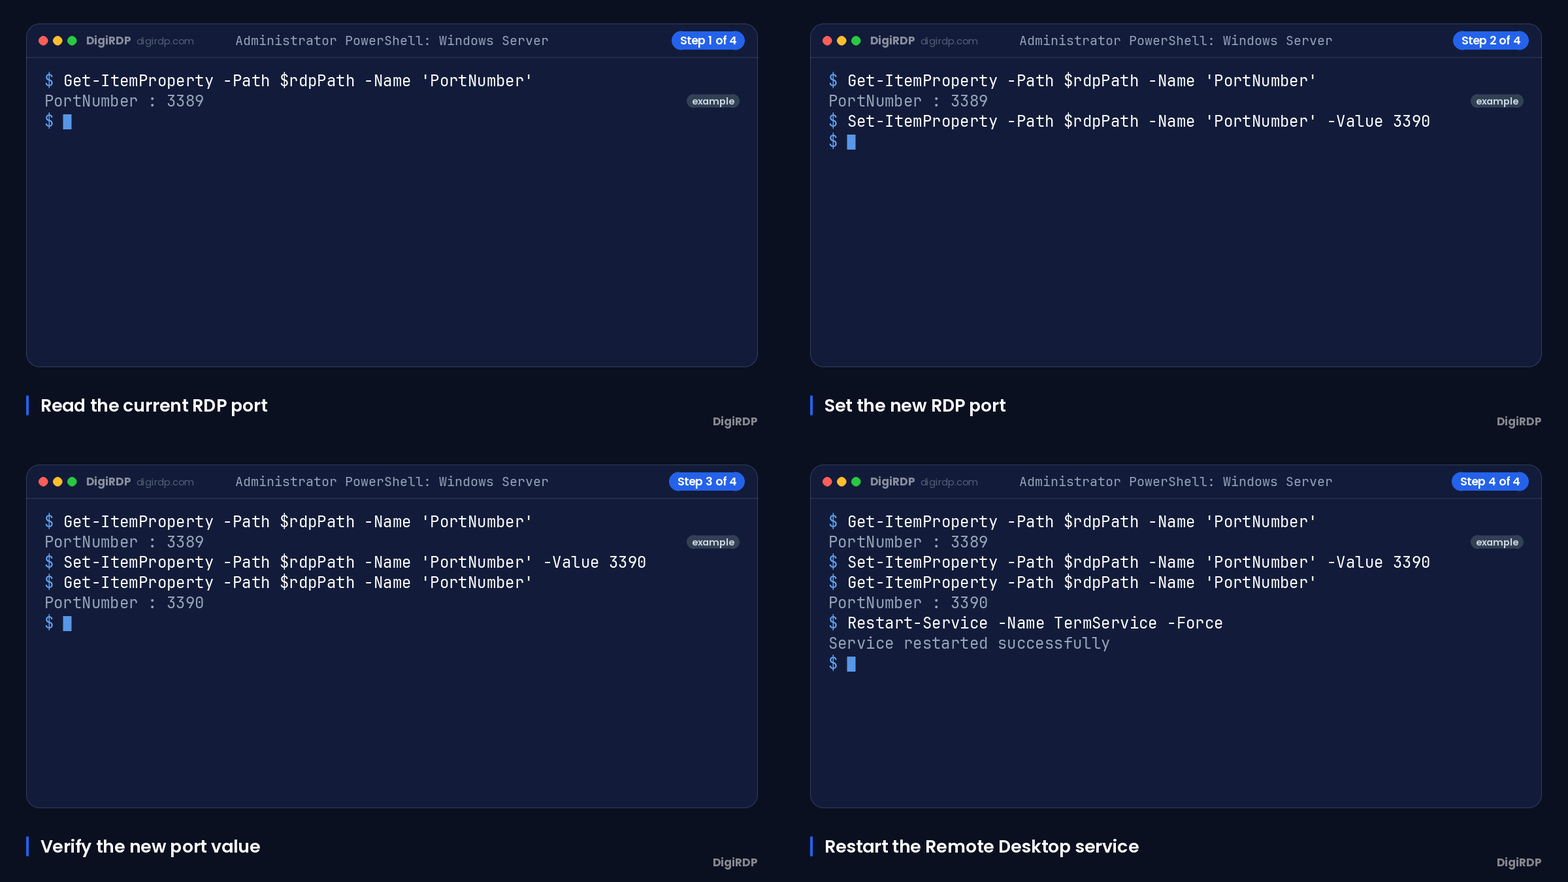
Use Registry Editor to change PortNumber
Alternatively, run regedit as an administrator and browse to the listener key. Open PortNumber, select Decimal, enter the replacement port, and select OK. Do not enter a decimal port value while the editor is interpreting it as hexadecimal.
Use PowerShell to read and update PortNumber
The PowerShell method reads and changes the same registry value as Registry Editor. It is useful when you want to verify the old and new values directly in the administrative session.
Restart Remote Desktop Services or the server
After changing the port number, Remote Desktop Services must be restarted before the new assignment takes effect. If restarting the service is not appropriate for the server's workload, restart the server through your established recovery path instead.
Allow and Test the New Remote Desktop Port
Changing the listener alone does not make the new port reachable. Windows Firewall must allow inbound traffic on the replacement port, and every upstream firewall or network access rule between your client and the server must also permit it.
Create inbound TCP and UDP firewall rules
Run the following in elevated PowerShell after replacing 3390 with the selected port. Microsoft provides separate inbound-rule examples for TCP and UDP.
$portValue = 3390
New-NetFirewallRule -DisplayName 'RDP custom TCP 3390' -Direction Inbound -Action Allow -Protocol TCP -LocalPort $portValue
New-NetFirewallRule -DisplayName 'RDP custom UDP 3390' -Direction Inbound -Action Allow -Protocol UDP -LocalPort $portValue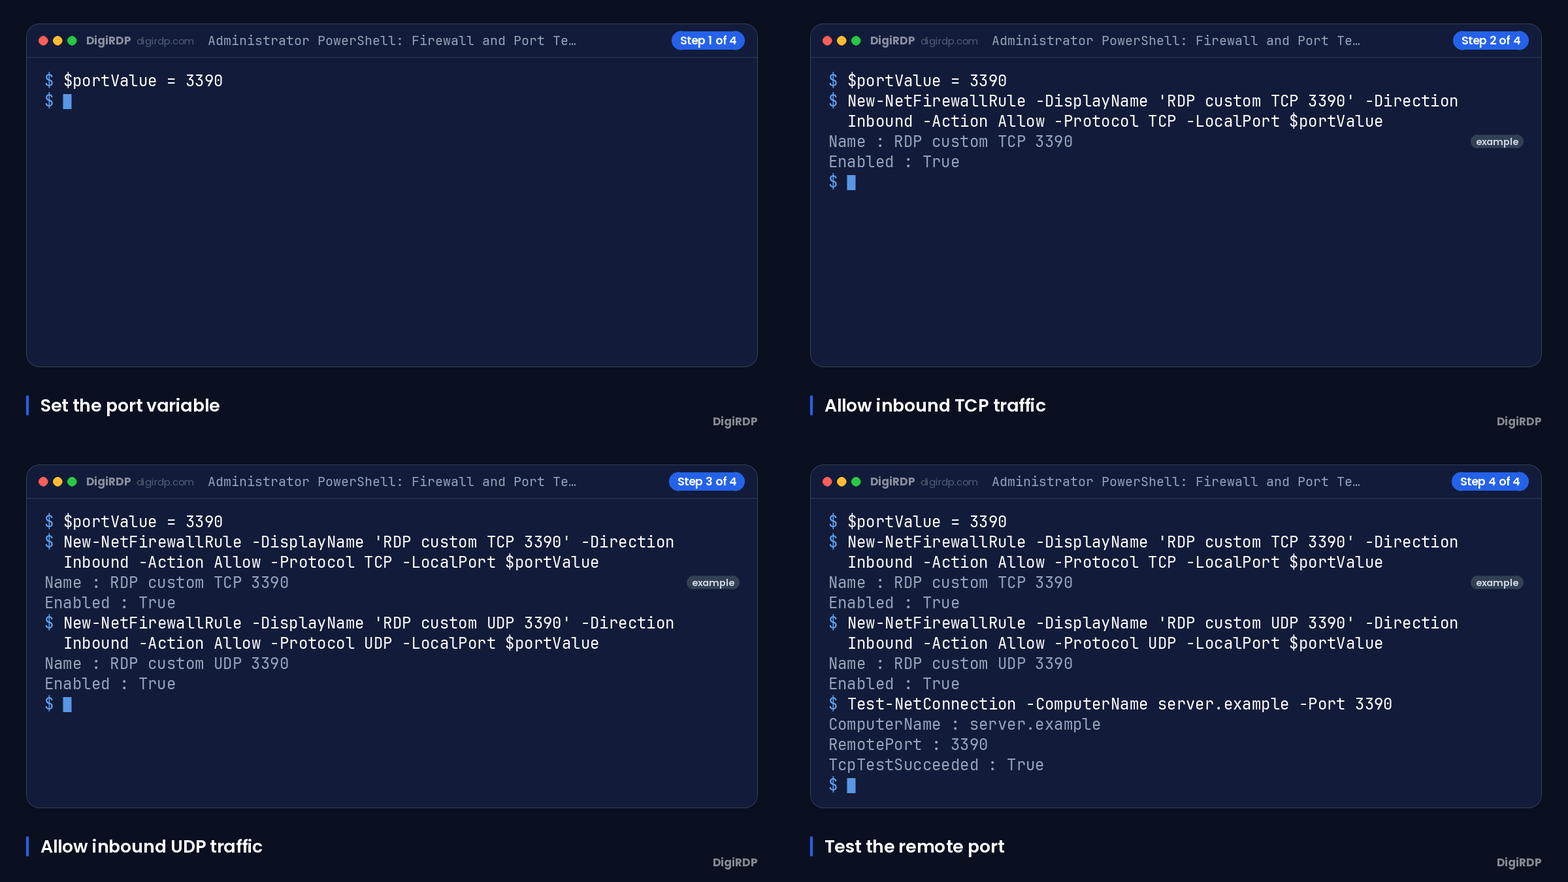
Check external firewall and network access rules
Review the firewall, security policy, router, or network access rule that sits in front of the server. Permit the selected port for the source addresses that require access. A local Windows Firewall rule cannot override a block at an upstream layer.
Connect with hostname or IP address followed by a colon and port
From a separate client, open Remote Desktop Connection and enter the server hostname or IP address followed by a colon and the selected port, for example server.example:3390. Keep the original RDP session active until this second connection is authenticated and usable.
Test TCP reachability with Test-NetConnection
Before or alongside the graphical login test, run this command from a client that should be allowed to reach the server. Replace the host name and port with your own values.
Test-NetConnection -ComputerName server.example -Port 3390A successful TCP result confirms reachability to that TCP port from the test client, but it does not replace an authenticated RDP login test. If the result fails, review the listener, Windows Firewall, and upstream filtering in that order. For additional connection diagnostics, see RDP connection diagnostics.
Recover Access and Harden the RDP Endpoint
If the new connection fails while the old RDP session still works, do not close the old session. Use it to verify the listener and firewall configuration, or revert the port before attempting further changes.
The table below maps common symptoms to the layer to verify and the safest next recovery action.
| Symptom | Likely layer | Verification | Recovery action |
|---|---|---|---|
| New port is absent from listeners | Listener or service | Run netstat -ano | findstr :3390 on the server. | Confirm PortNumber, then restart Remote Desktop Services or the server. |
| TCP test fails from an authorised client | Windows Firewall or upstream firewall | Run Test-NetConnection -ComputerName server.example -Port 3390 and review inbound rules. | Allow the port at Windows Firewall and the upstream network layer. |
| New connection fails but the existing session remains active | Client syntax, firewall, or listener | Check that the client uses hostname:port and that the port is Listening. | Keep the current session open, correct the affected setting, and test again. |
| No remote route remains | Recovery access | Use the console or authorised alternative access method. | Restore the previous port from the exported registry file or set the former PortNumber value manually. |
Restore the previous listener port from console access
From console or another authorised administrative route, restore the exported key and restart the server. This returns the listener configuration to the saved state.
reg import C:\Rdp-tcp-backup.reg
Restart-Computer -Force
If you prefer to set the previous port directly, replace 3389 below with the value recorded before your change, then restart the service or server.
$rdpPath = 'HKLM:\SYSTEM\CurrentControlSet\Control\Terminal Server\WinStations\RDP-Tcp'
Set-ItemProperty -Path $rdpPath -Name 'PortNumber' -Value 3389
Restart-Service -Name TermService -Force
Diagnose registry, service, firewall and routing failures
First, check that PortNumber contains the intended decimal value. Next, confirm that the chosen port has a Listening state after the service or server restart. Then verify both Windows Firewall rules and upstream access rules. Finally, confirm that the client specifies the host and port together.
Use Network Level Authentication and narrowly scoped firewall rules
Changing the port does not replace authentication or firewall controls. Require Network Level Authentication where your environment supports it, use strong account security, and limit inbound firewall rules to approved source addresses where practical. You can continue with related RDP security measures in RDP security measures.
Frequently Asked Questions
How do I change the RDP port in Server 2019?
On Windows Server 2019, back up RDP-Tcp, change PortNumber in Registry Editor using the Decimal option or with PowerShell, restart Remote Desktop Services or the server, and allow the same port through Windows Firewall and any upstream firewall. Test a second connection using hostname:port before ending the original session.
What is the RDP port registry path?
The RDP listener registry path is HKEY_LOCAL_MACHINE\SYSTEM\CurrentControlSet\Control\Terminal Server\WinStations\RDP-Tcp. The value to change is PortNumber.
How do I check whether the new RDP port is reachable?
From an authorised client, use Test-NetConnection -ComputerName server.example -Port 3390, substituting your server and selected port. Also confirm from the server that the port is in a Listening state and complete a separate authenticated RDP login test.
Should you open both TCP and UDP for a changed RDP port?
Yes. Microsoft documents RDP as using TCP and UDP 3389 by default and provides separate inbound firewall-rule examples for TCP and UDP when changing the listener port. Permit both protocols for the same replacement port where your network design allows it.
How do I RDP to another server on a custom port?
In the Remote Desktop client, enter the hostname or IP address followed by a colon and port, such as server.example:3390. The server must be listening on that port, and firewall rules along the route must allow it.
How do I recover if I cannot connect after changing the RDP port?
Use console access or another authorised administrative path. Import the registry backup or restore the former PortNumber value, restart Remote Desktop Services or the server, and then verify the original connection method before trying again.
Sources
- Change Remote Desktop listening port on Windows and Windows Server | Microsoft Learn — learn.microsoft.com
- Ports That Are Used by RDS - Windows Server | Microsoft Learn — learn.microsoft.com
- Test-NetConnection (NetTCPIP) | Microsoft Learn — learn.microsoft.com
- netstat | Microsoft Learn — learn.microsoft.com
- General Remote Desktop connection troubleshooting - Windows Server | Microsoft Learn — learn.microsoft.com
- Troubleshoot Remote desktop disconnected errors - Windows Server | Microsoft Learn — learn.microsoft.com
- RemoteDesktopServices Policy CSP | Microsoft Learn — learn.microsoft.com
Ready to deploy your own server?
Full admin access, DDoS protection and instant setup — pick a plan sized to your workload.
Explore Windows RDP plans